 Ethan+
How I Run a Coding Agent on GPT-6 Pro Without Touching My Codex Limits
Codex and Work share one allowance. Regular Chat has its own. Here is how to point a normal ChatGPT conversation at your files and let Astra do the work, step by step, with the safety rails I actually use.
- Published
- September 15, 2026
- Reading time
- 14 min read
- Author
- Ethan Rogers
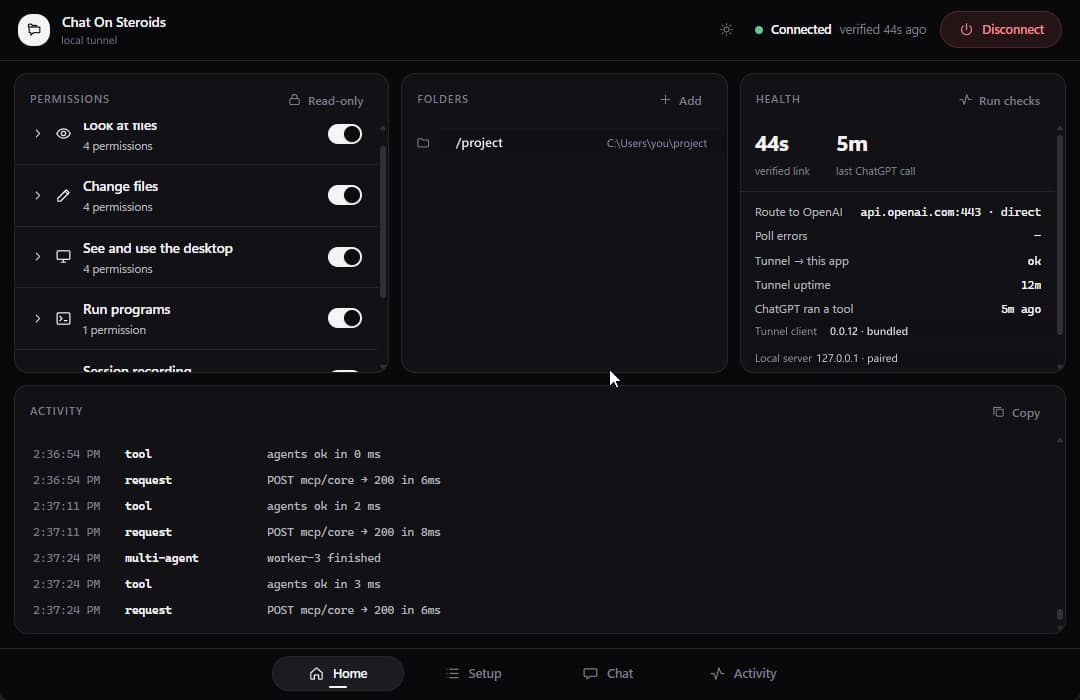
If you pay for ChatGPT Pro, you are sitting on more Astra than you are using.
Here is the thing most people miss. Codex and Work pull from the same allowance. Regular Chat does not. So every hour you spend in Codex is an hour of coding-agent time you are paying for twice, once in the plan and once in the limit, while the Chat side of the same plan sits there mostly idle.
There is a way to flip that. You give a normal Chat conversation, with GPT-6 Pro selected, a connection to a folder on your Mac. It reads the files, edits them, runs a command if you allow it, and reports back. Same model. Same account. Different bucket.
The tool that makes this possible is a small open source app called Chat On Steroids. This is exactly how I set it up, including the parts where I stopped and thought twice.
One honest note before we start. This is not unlimited, and I am not going to tell you it is free. Chat has its own limits and they can change. What you get is a second lane for agent work that most people never use. That is worth an afternoon.
What you are actually building
Four pieces, and it helps to know what each one does before you install anything.
Your ChatGPT conversation (Chat, not Work, with 6 Pro selected)
    -> a custom MCP connection called "Chat On Steroids Core"
    -> the Chat On Steroids app running on your Mac
    -> one approved folder, read-only at first
- The app. Chat On Steroids (CoS) runs on your Mac and exposes tools to ChatGPT: read a file, patch a file, run a command. It decides which folders are visible and which tools are switched on.
- The Chrome extension. A companion that pairs your ChatGPT tab with the app so the app can see which conversation is doing the work and pick the model for you.
- The tunnel. OpenAI's Secure MCP Tunnel. It is an outbound connection from your Mac, so nothing on your machine is exposed to the internet.
- The connector in ChatGPT. A Developer mode app that points at that tunnel. When you attach it to a conversation, the model gets the tools.
None of this talks to Codex. It is plain Chat with hands.
App screenshots below are from the project's own docs, which are MIT licensed.
Before you touch anything
Check these first or you will waste the afternoon.
- A Mac on macOS 13 or newer, Apple silicon or Intel. Know which one you have. Apple menu, About This Mac.
- Chrome 116 or newer. Edge works too. Firefox does not count for this.
- A ChatGPT plan with Developer mode and custom MCP apps. OpenAI's developer docs list Pro, Plus, Business, Enterprise and Education. The Help Center wording is fuzzier about which plans get write access. Do not trust the plan name. Open the settings and look.
- Astra in the picker. In a regular Chat conversation, open the model picker and confirm you can select 6 Pro. If it is not there, stop. Nothing below will make it appear.
- A throwaway folder. Make one. Do not point this at a client repo on day one.
Then the part I want you to read twice. The app's file tools only touch folders you approve. The command tool does not have that fence. When you turn on command execution, whatever runs has the same power as you sitting at the terminal. So we start read-only, we test, and we only widen access on purpose.
Step 1. Download the right build and check it
Go to the releases page and grab the latest stable version.
github.com/totec448-spec/chat-on-steroids/releases/latest
When I did this, latest was 2.1.12. The Mac files are:
| Your Mac | File |
|---|---|
| Apple silicon | Chat-On-Steroids-macOS-arm64.dmg |
| Intel | Chat-On-Steroids-macOS-x64.dmg |
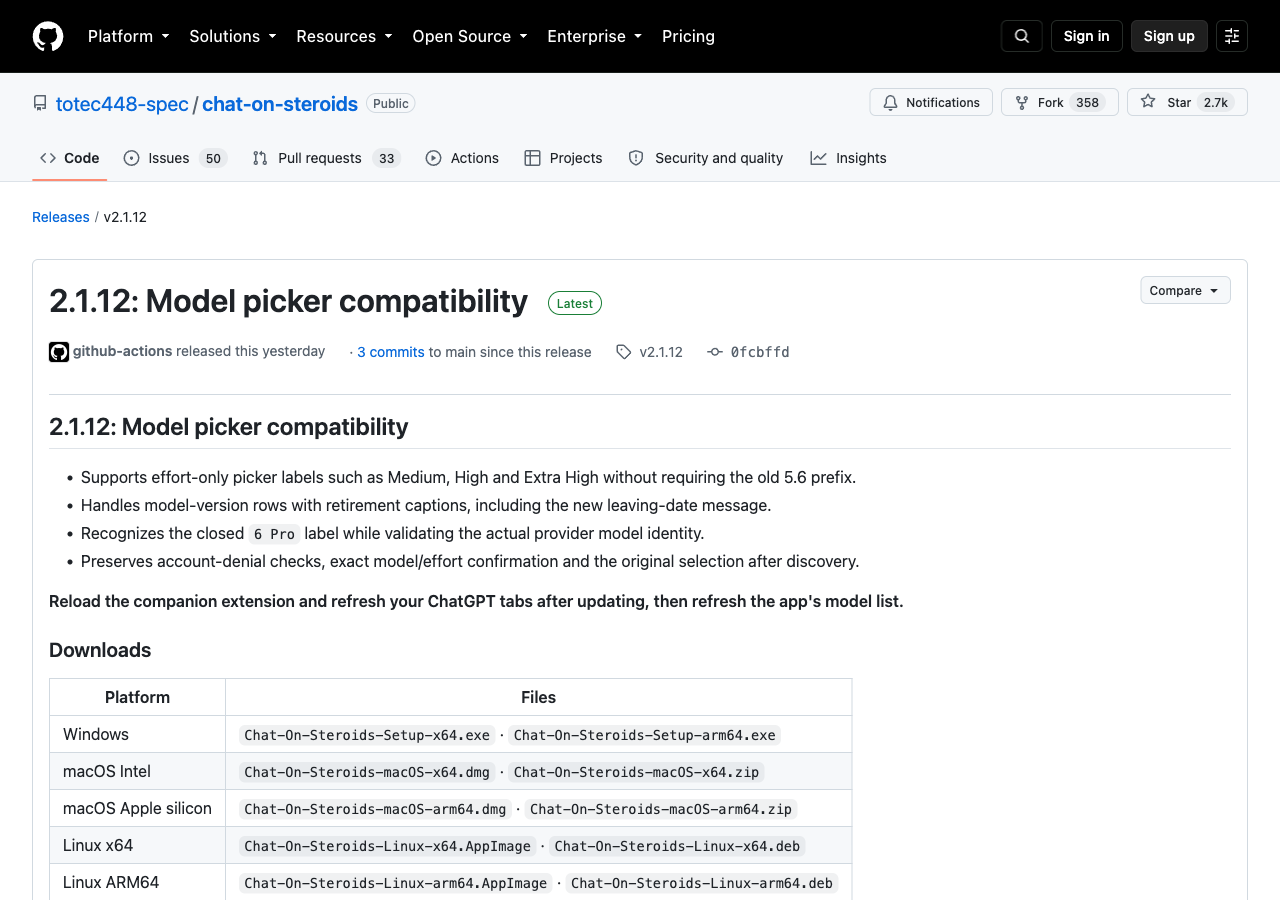
Download the DMG for your chip and also download SHA256SUMS.txt from the same release. Then check the file matches what the project published:
shasum -a 256 ~/Downloads/Chat-On-Steroids-macOS-arm64.dmg
Compare the output with the matching line in SHA256SUMS.txt. If it does not match, delete it and download again. A matching hash tells you the file is the one the project published. It does not tell you the project is trustworthy. That judgment is still yours, which is why the next steps are careful.
Step 2. Open it past the warning
The Mac builds are not signed or notarized, so macOS will refuse to open it the first time.
- Drag the app into Applications from the DMG.
- Open it. macOS will say it cannot verify the developer. Close the dialog.
- Open System Settings, then Privacy & Security. Scroll down. You will see a line about the app being blocked with an Open Anyway button. Click it, confirm, and the app launches.
Do not turn off Gatekeeper for everything, and do not run any "remove quarantine" command someone pastes in a forum. The per-app exception is all you need. If macOS says the app is damaged or flags malware, that is a different message. Stop and look into it.
Step 3. Approve one folder and lock it to read-only
Open the app and go to Settings, then Workspace. This screen is the whole security model, so slow down here.
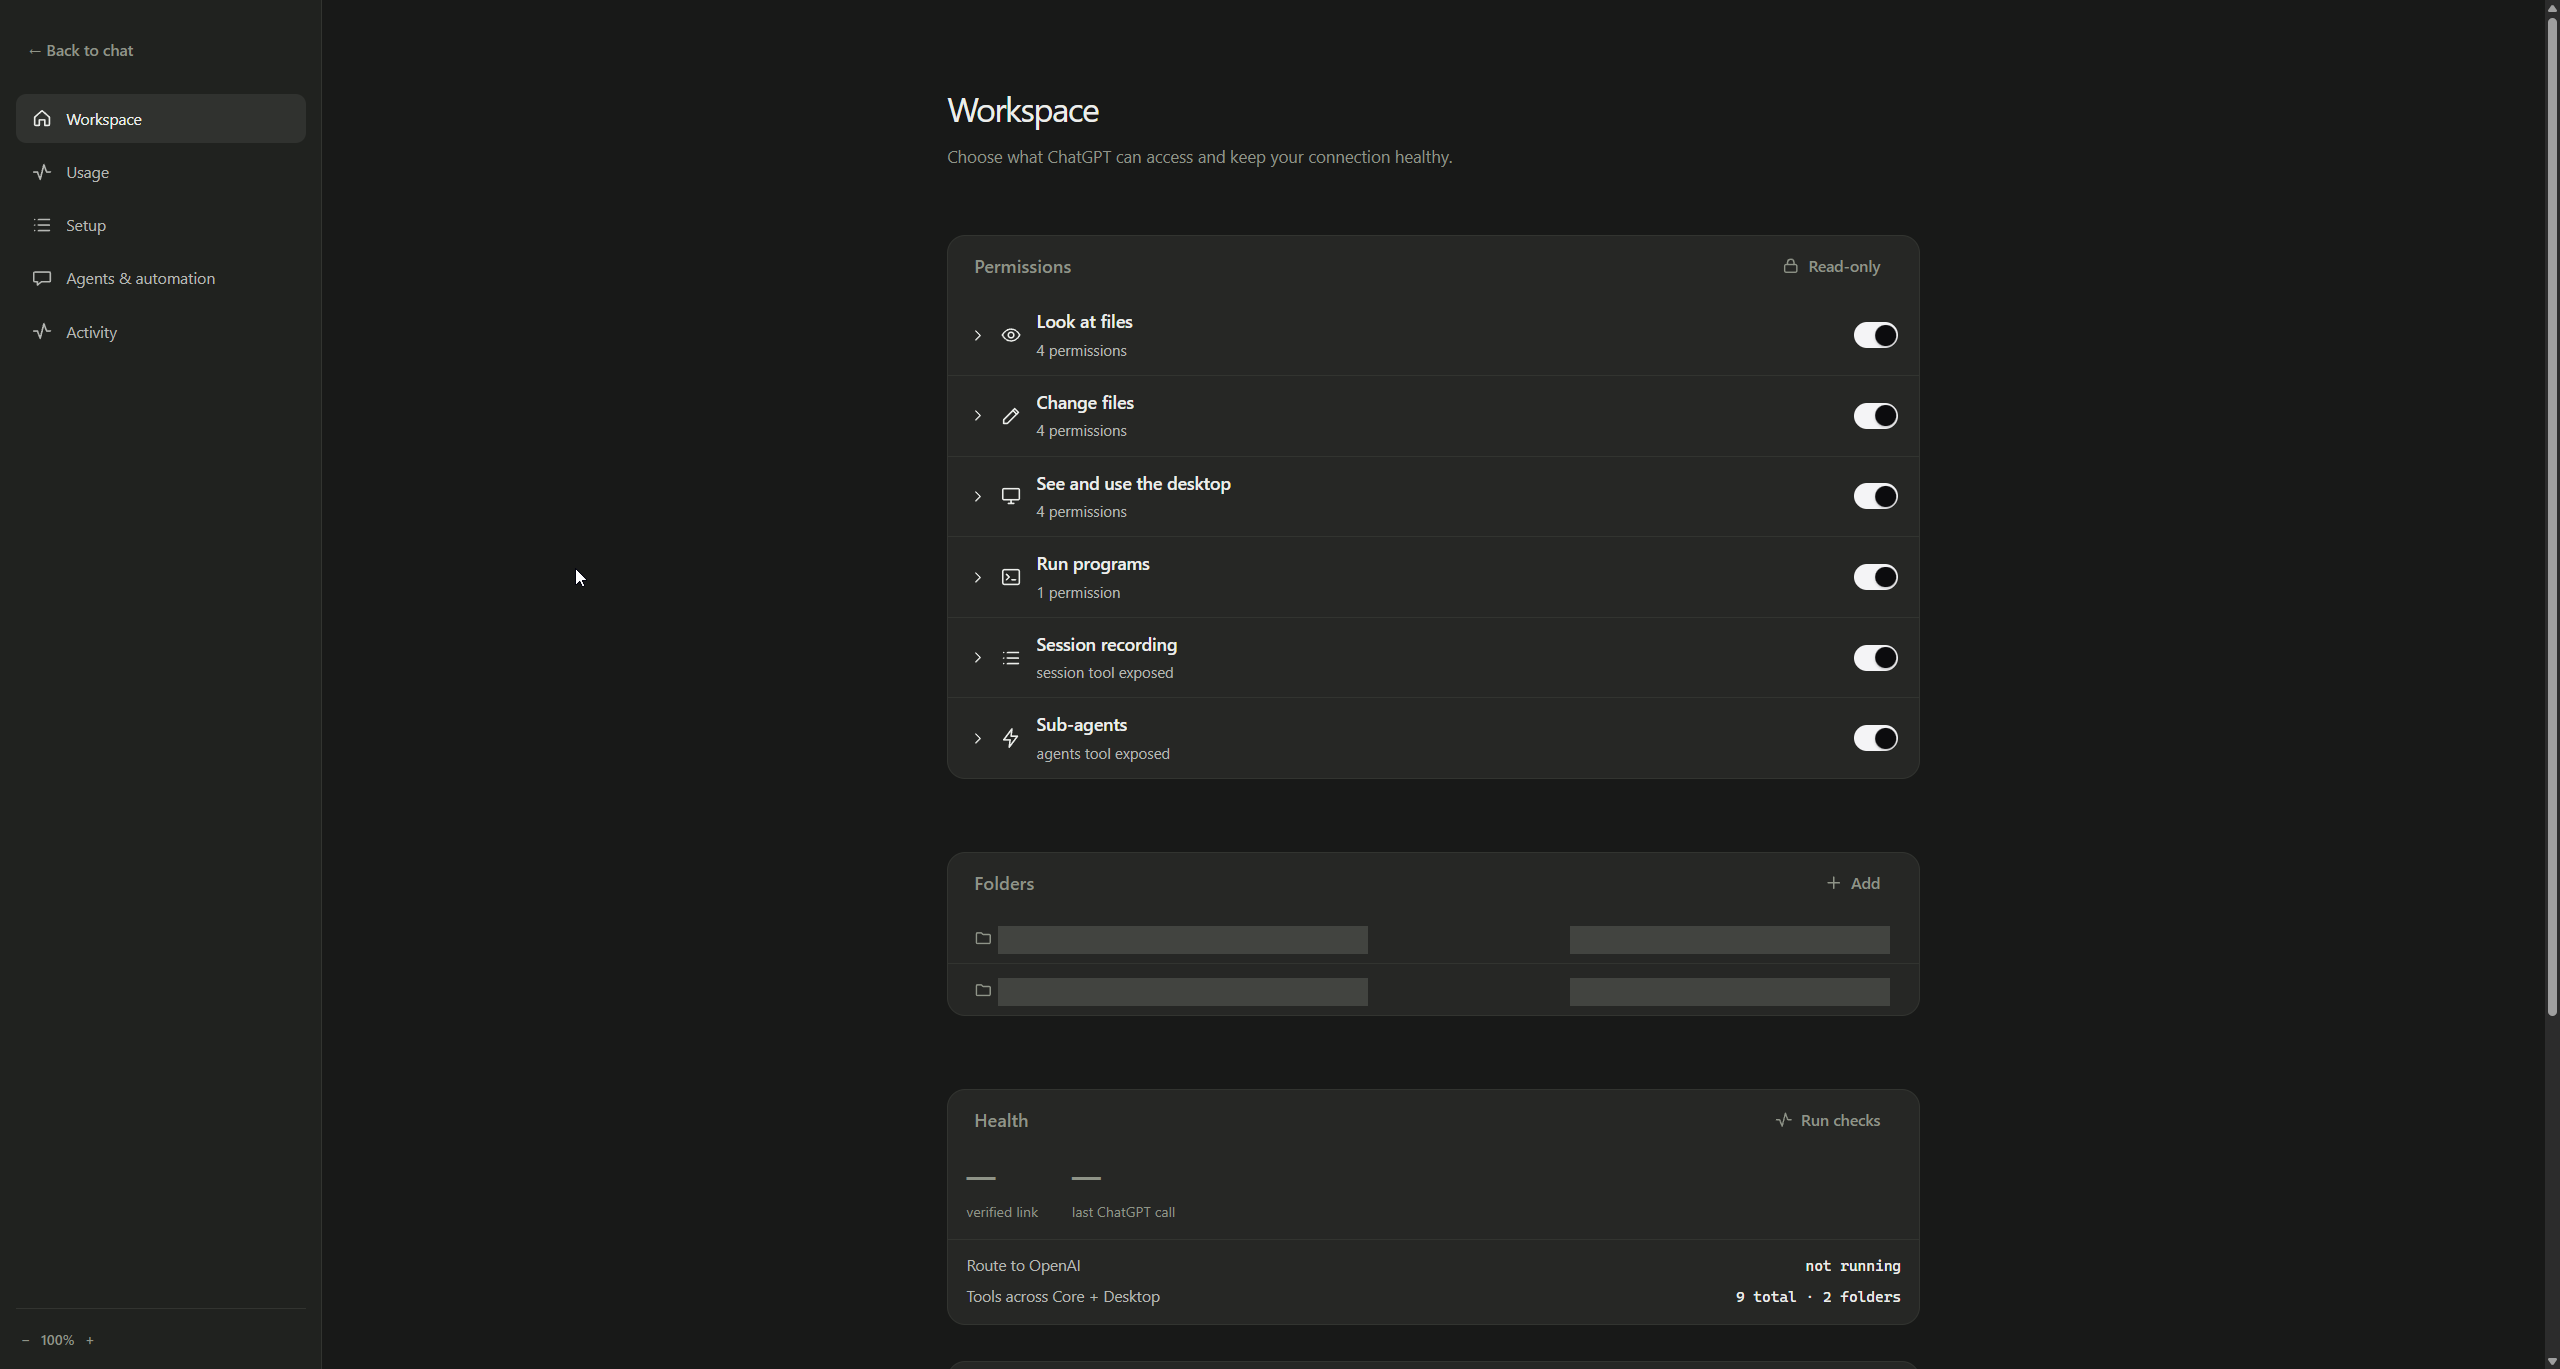
Do this in order:
- Under Folders, click Add and pick the throwaway folder you made.
- Turn on Read-only. It is the lock at the top of the Permissions card.
- Open each group and switch off anything that is not looking at files. On a fresh install a lot of this is on by default, and the defaults are generous.
My pilot settings, so you can copy them:
| Setting | Start with |
|---|---|
| Approved folders | Only the test folder |
| Read-only | On |
| Change files | Off for now |
| Run programs | Off for now |
| See and use the desktop | Off |
| Sub-agents and workers | Off |
| Goal and Loop | Off |
| Any extra plugin connectors | Off |
Read-only removes the write, command and clipboard permissions in one move. You will turn specific things back on later, one at a time, after you have seen a read work.
Before you go further, drop a file in the test folder called read_probe.txt with a random word or number inside it. Something you would not guess. You will use it in the first test and it matters that the model has never seen the value.
Or skip the typing. I packaged the exact folder I tested with: a script that writes the random probe value, the three test prompts, the daily task prompt, and a short README.
Download the test folder (zip, 4 KB)
Unzip it anywhere, approve that folder in the app, then run bash make-probe.sh in Terminal from inside it. It prints the value so you can check the model's answer against it.
Step 4. Load the Chrome extension
The app ships its own extension. Use that one, not a copy from somewhere else.
- In the app, click Open extension folder. Finder opens on it.
- In Chrome, go to
chrome://extensions. - Turn on Developer mode in the top right. This is Chrome's developer mode, which has nothing to do with ChatGPT's.
- Click Load unpacked and select the folder Finder just opened.
- Sign in to ChatGPT in that Chrome profile and open a conversation.
Pairing is automatic. Click the extension icon on a ChatGPT tab and you should see it connected on a local port, with the tab and chat recognized.
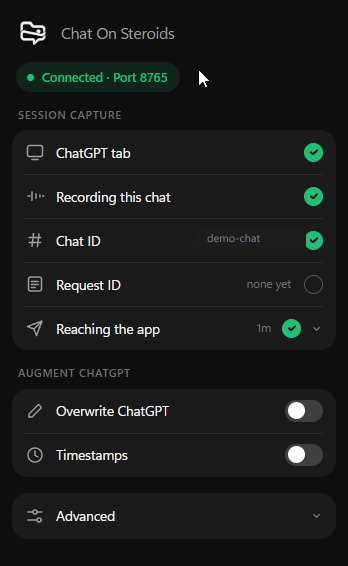
If this popup says it is not connected, fix that here before moving on. Pairing is a browser problem. It has nothing to do with the tunnel or your account, and mixing the two up is how people lose an hour.
Step 5. Build the tunnel
This is the part that sounds hard and is not. The app already includes the tunnel client. You just need OpenAI to know about it.
Open the tunnel settings for your Platform organization:
platform.openai.com/settings/organization/tunnels
- Create a tunnel. Give it an obvious name. Make sure it is in the organization tied to the ChatGPT workspace you actually use.
- Create a restricted API key with only two permissions: Tunnels: Read and Tunnels: Use. Nothing else. This key does not run models, so it does not need model access.
- Copy the tunnel ID and the key.
Back in the app, go to Settings, then Setup. Pick the secure tunnel transport for Core, paste the tunnel ID and the key, and press Connect.
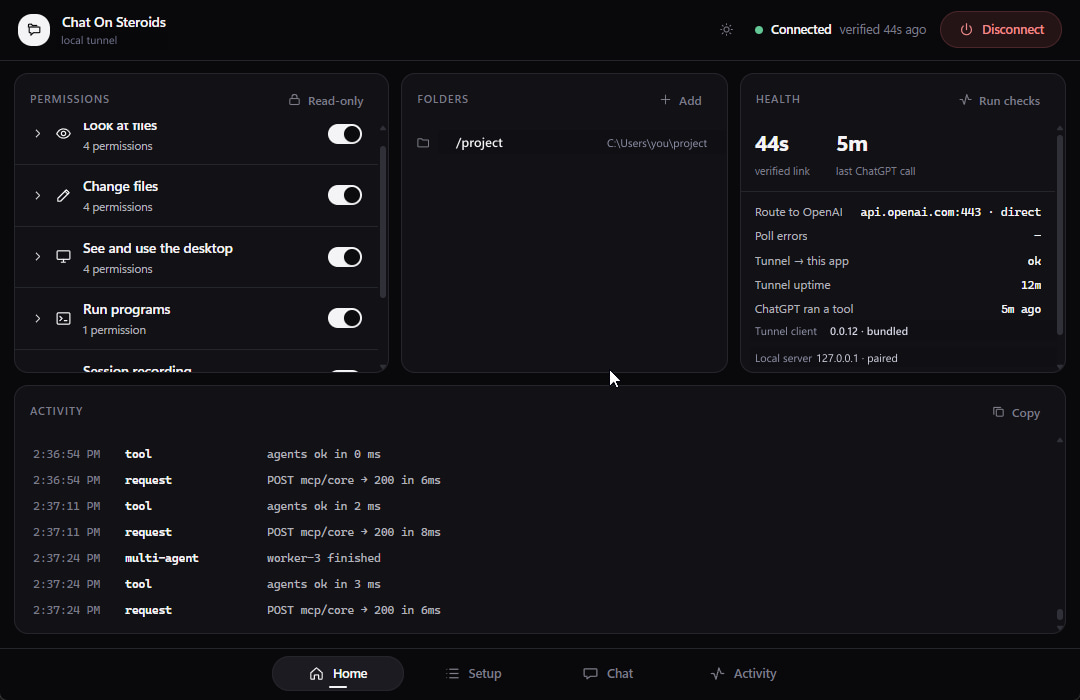
The Health panel is your friend. Route to OpenAI, tunnel to this app, last ChatGPT call. If the tunnel shows healthy but nothing else works, the problem is later in the chain, not here.
Two things I will not do and suggest you do not either. Do not widen the key's permissions because something failed. Do not put the key or a tunnel URL in a screenshot, a note, or a chat. If a transport error is stopping you, the app also supports a Cloudflare quick tunnel, but that puts a public URL with a secret path on the internet and it changes every restart. I skip it.
Step 6. Turn on Developer mode in ChatGPT and add the app
Now ChatGPT needs to know the tunnel exists.
- In ChatGPT, open Settings, then Security and login, and switch on Developer mode. Older help articles put this under Apps and Advanced settings. Either way, find the toggle.
- Go to Plugins and click +. This only offers a developer-mode app once Developer mode is on.
- Name it
Chat On Steroids Core. Under Connection choose Tunnel and select the tunnel you just made. - Look at the tools it discovers before you enable them. For the pilot you should see
read. You will also seeapply_patchandexec_command. Those are the write tool and the shell tool. Leave them alone for now.
One thing worth knowing. ChatGPT treats any tool that is not explicitly marked read-only as a write, and it asks you to approve writes by default. You can tell it to remember an approval inside a conversation. A new conversation asks again. That is the behavior you want.
ChatGPT caches that tool list. When you later change permissions in the app, come back to the connection's details page and click Refresh, check the new tool is toggled on, then start a fresh conversation. An existing chat keeps the old list. Stale tool metadata is the most common reason things "stopped working."
Step 7. Pick the project and pick Astra
Open the app's chat view. It looks like ChatGPT, on purpose. Select your test folder as the project, and open the model selector.
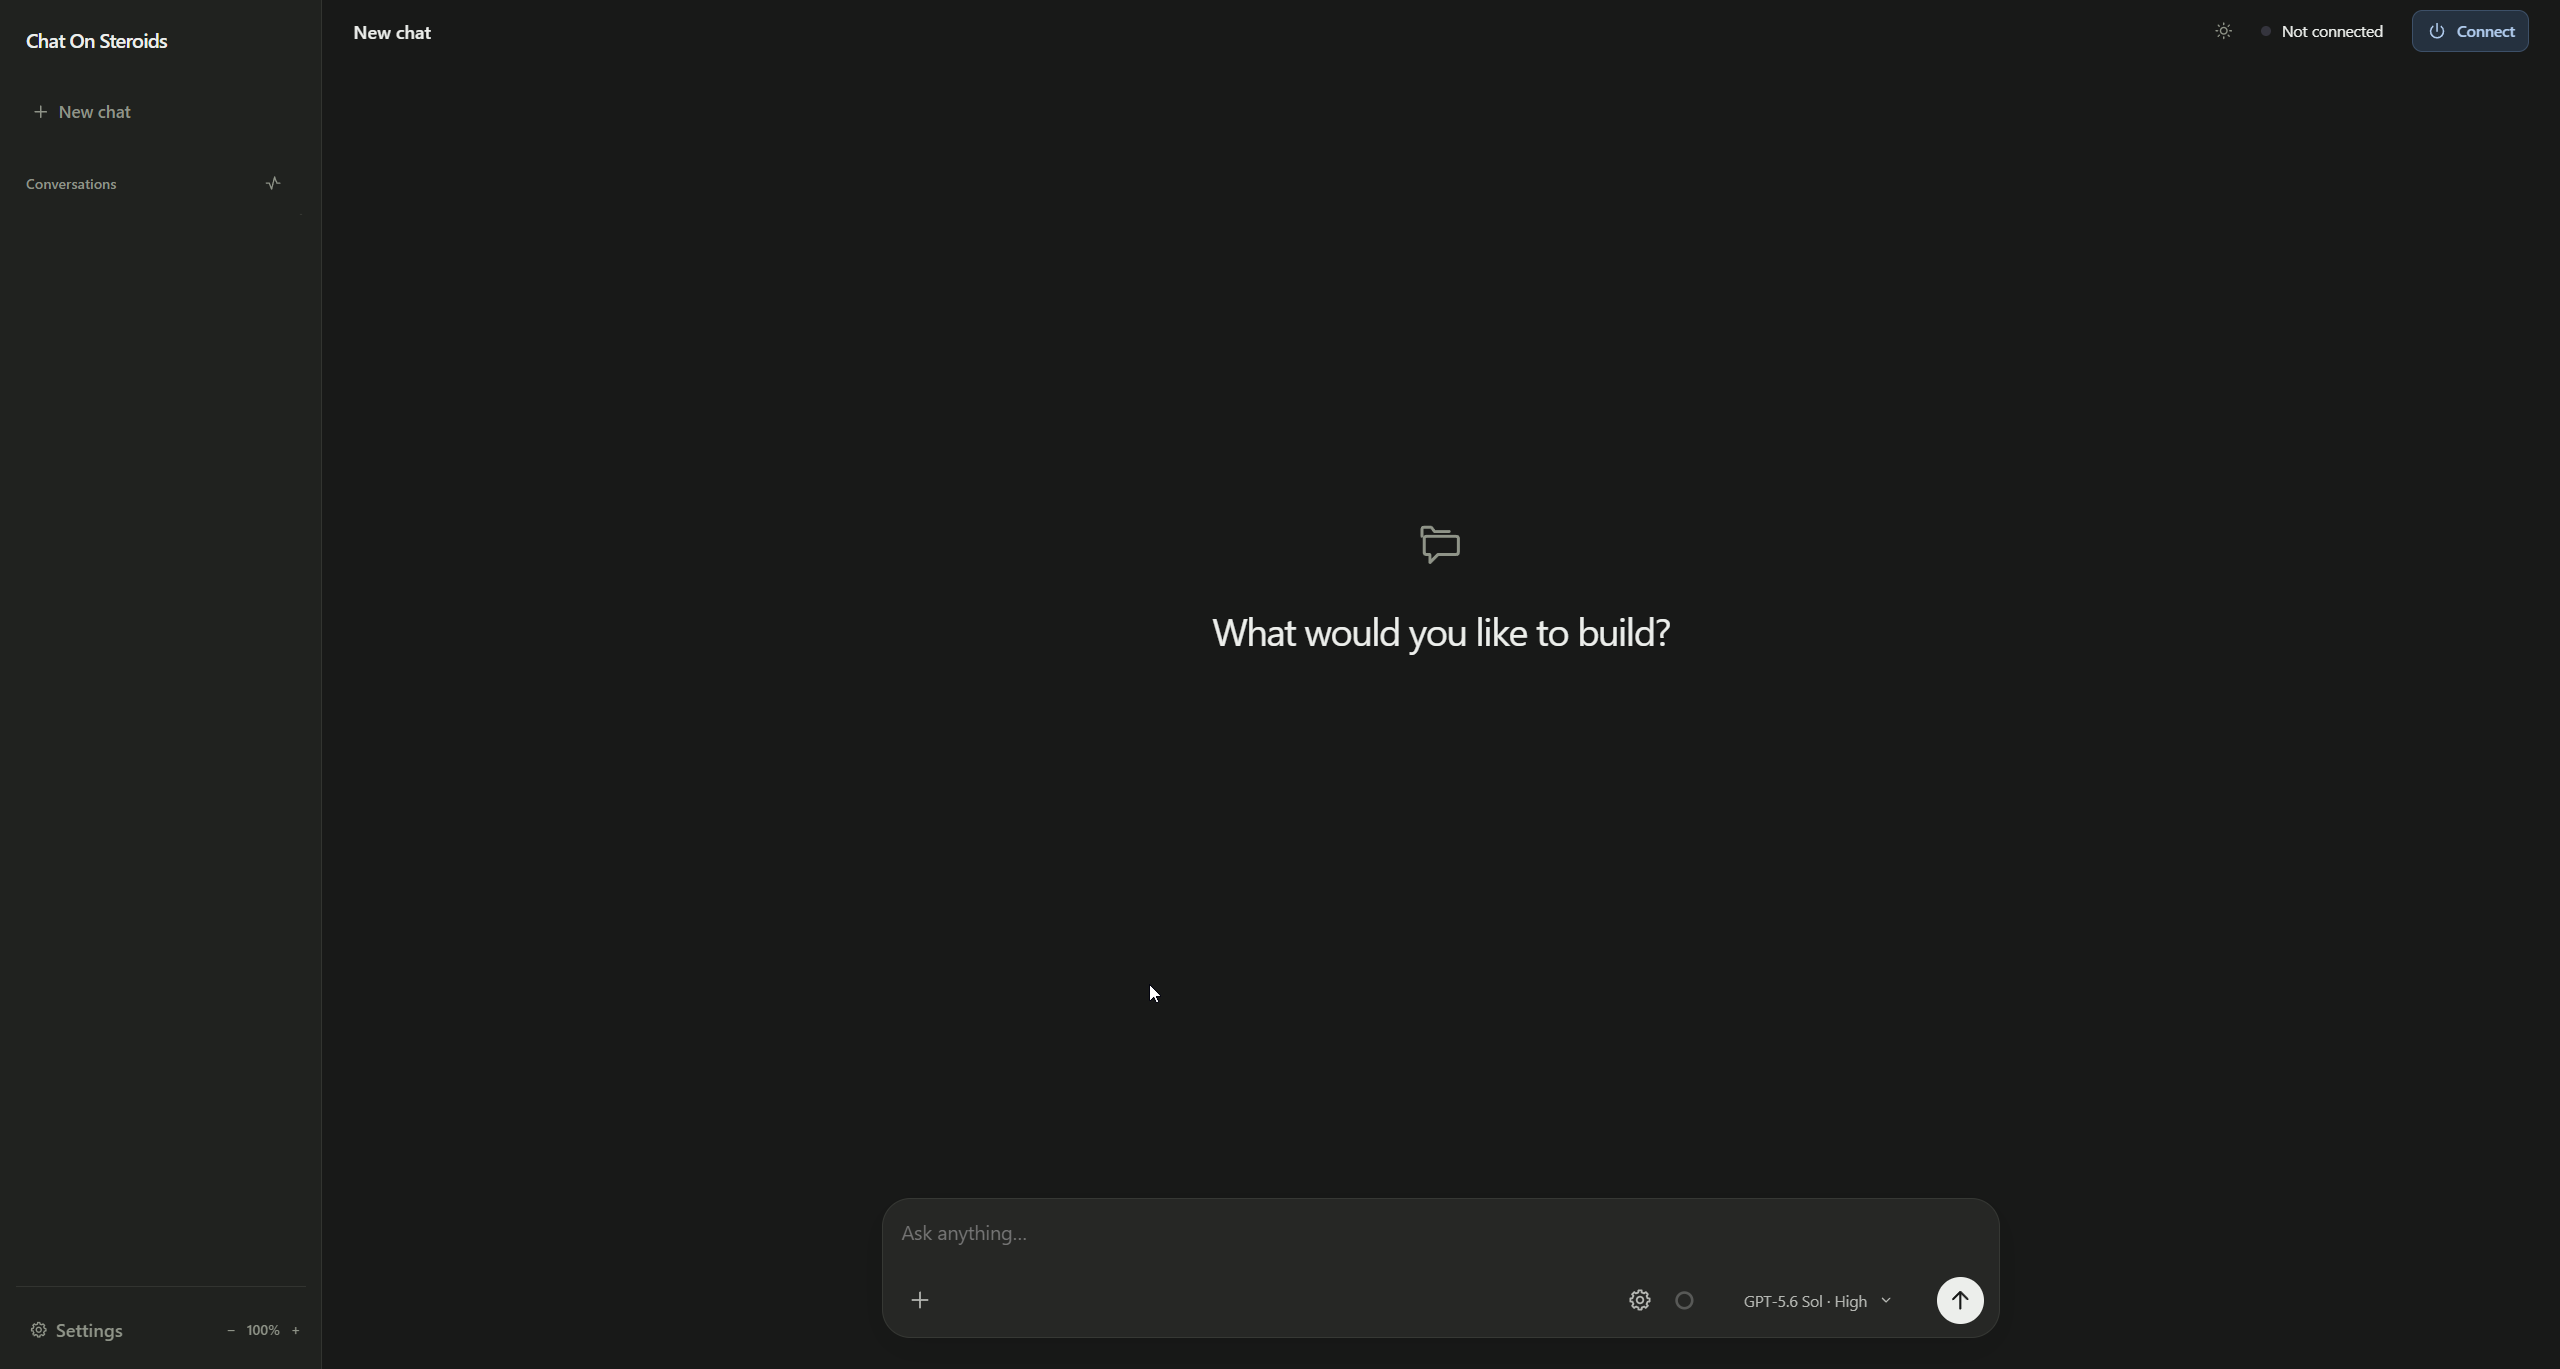
The model picker mirrors what your account can see. Choose 6 Pro.
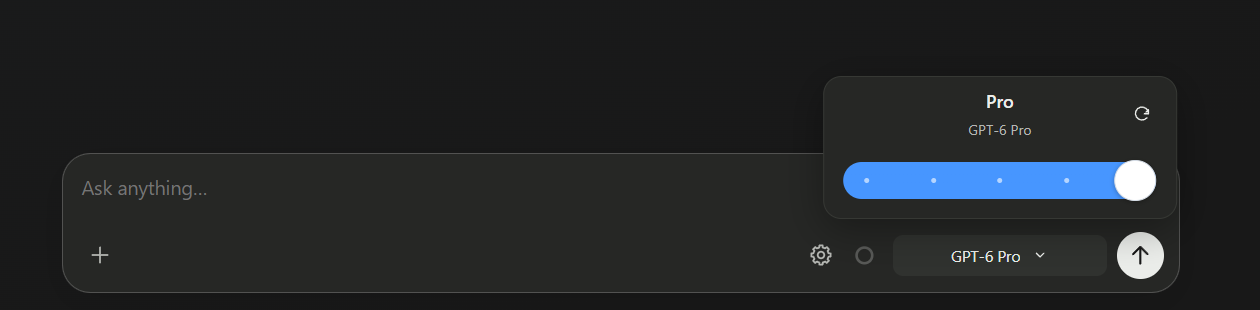
Now go look at the actual ChatGPT tab in Chrome. This is the check that matters. The conversation should be in Chat, not Work, and the picker in the ChatGPT window should show 6 Pro. The app's label is a convenience. The provider window is the truth. If you cannot see it there, treat the model as unverified.
Attach Chat On Steroids Core to that conversation: click + in the composer and pick it. A blue chip with its name appears in the composer, and that chip is what gives the model the tools. Do not let anything quietly fall back to a Work conversation.
One more thing to find before the tests. The path the model sees is not the path on your Mac. My folder is ~/Desktop/ChatGPT-Steroids, and the model sees it as /chatgpt-steroids, lowercase, with no Desktop in it. The app shows both in the Folders list. Use the model's version everywhere I write TEST_PROJECT below.
Step 8. Prove it works, three times
Do not skip this. "It says connected" is not a result. A real read, a real write, and a real command are results.
Test A. Read something it could not know
With Read-only still on, paste this into the conversation. Replace TEST_PROJECT with the project path the app shows for your folder. It may not be the same as the path on disk, so use what the app displays.
Use only Chat On Steroids Core for this connection test.

In TEST_PROJECT, use Core's read tool to list the top-level entries,
then read read_probe.txt and report its exact content.

Do not write files, execute commands, launch workers, or inspect
other folders. Do not substitute built-in Python, a cloud sandbox,
other file connectors, or a simulated response.

If Core is unavailable, denied, or fails, report the actual error.
Pass means it returns the random value you put in the file, and you can see a real tool call in the conversation. If you get a confident paragraph and no tool result, that is a fail, no matter how friendly the paragraph sounds.
Here is what mine did. The first time, I left TEST_PROJECT in the prompt by mistake. Core came back with "Not found: /chatgpt-steroids/TEST_PROJECT", told me the nearest existing folder was /chatgpt-steroids and that it contained read_probe.txt, and stopped. It did not guess. That is the behavior you want from a tool with hands. With the real path it listed the one file, read it, and returned probe-45psfet4bu, the exact value in the file.
It also appended a note that the calls were recorded as "Unattributed" because Core could not identify the conversation. The extension popup showed the tab, the chat and a Chat ID all green, and the reads still worked. I have not found what clears it. Treat it as a logging detail on this version, not a failure.
Test B. Let it write one file
Go back to the app. Turn off Read-only and enable only file changes. Keep programs, desktop, and sub-agents off. Refresh the connection in ChatGPT and start a new conversation.
Use only Chat On Steroids Core for this authorized file test.

In TEST_PROJECT, check whether _cos_connection_test.txt exists.
If it exists, stop without modifying it. Otherwise use apply_patch
to create it with exactly one line, followed by a newline:
CoS is connected.

Read the file back through Core. Do not change anything else,
execute commands, install packages, launch workers, commit,
push, or deploy.
ChatGPT will stop and ask you to approve the write. That prompt is in the chat window, not in the app. Approve it there.
Then open the folder in Finder and look at the file yourself. Do not create it by hand to make the test pass. If you are not sure whether the write happened, check the file and the app's Activity log before you ask it to try again.
Mine reported that it created the file because it did not exist, read it back, and verified one line with a trailing newline, 18 bytes. Finder agreed: _cos_connection_test.txt, 18 bytes, created the minute I approved it.
Test C. One harmless command, only if you want it
This is the step where you decide how much you trust the setup. Commands run as you, with your permissions, and they are not confined to the approved folder. If you are on a machine with client secrets, I would run this on a separate user account or skip it. Skipping it is a valid choice. File access alone is already a lot.
If you go ahead, enable Run programs in the app, refresh, new conversation:
Use only Chat On Steroids Core for this authorized terminal test.

Use exec_command with TEST_PROJECT as the working directory to run:
pwd && printf 'COS_COMMAND_OK\n'

Report the returned working directory, marker, and exit code.
Do not run any other commands, write files, access secrets,
launch Codex or other agents, install anything, or use the network.
When the tests are done, put Read-only back on. Turn things on again when you have a specific job.
How I actually use it day to day
The start of every session looks the same.
- Open the app and the paired Chrome window.
- Glance at Health. Tunnel ok, route ok.
- Pick the project. Pick 6 Pro. Confirm both in the ChatGPT tab.
- Attach Core to the conversation.
- Approve only the actions I asked for.
- When I am done, back to Read-only.
And the task prompt I reuse, because a scoped ask gets a scoped result:
Use Chat On Steroids Core on the selected project. Keep Astra.

Task: [specific change]
Acceptance criteria: [observable result]

Read relevant project instructions and only the context needed.
Implement the scoped change and run appropriate validation.
Use one agent; no workers, autonomous loops, agent CLIs, or API agents.
Preserve unrelated edits. Ask before installs, destructive actions,
secret access, commits, pushes, deployments, or permission changes.
Report changes, checks actually run, and remaining issues.
The app has more in it. Workers that spawn more chats, a Goal mode that keeps replying until it thinks the job is done, a Loop mode, a desktop controller that can click and type. I leave all of it off. I want one agent, one folder, and me approving the writes.
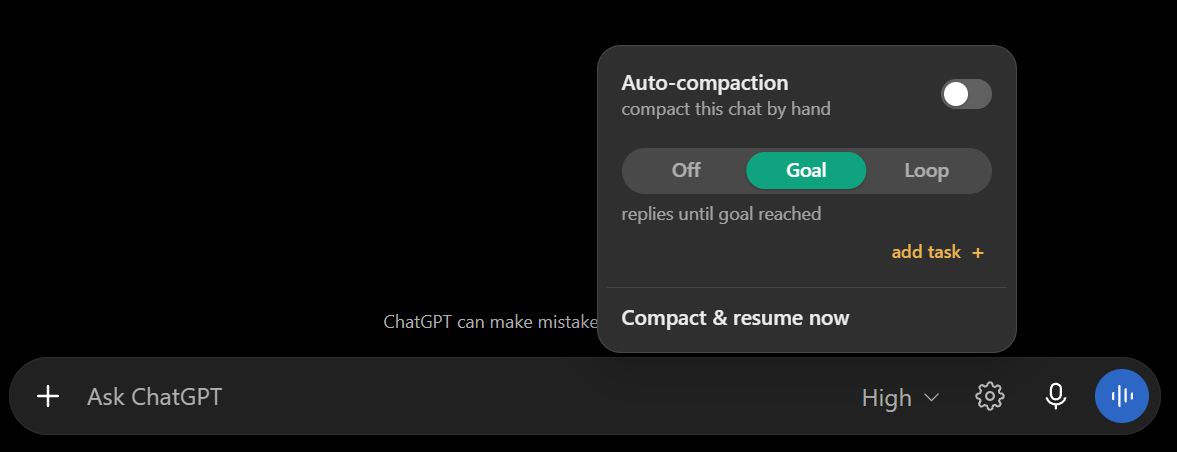
Where this can bite you
I would rather you hear these from me than find them at 11pm.
- It is a bucket, not a bypass. Chat has limits. They are separate from Codex, and that is the whole point, but they exist. If you hit one, you hit one. Do not go looking for ways around provider limits or refusals.
- The command tool is unfenced. File tools respect the approved folders. The shell does not. Treat enabling it like handing someone your terminal, because that is what it is.
- Session history sits on disk in plain form. The app records what happens in a session. Its credential storage is encrypted; that history is not. Do not run real client material through it until you have decided what you keep and for how long.
- Unsigned app. You are trusting a GitHub project. Read the release notes, check the hash, keep it in its own folder, and revisit that trust when you upgrade.
- Docs disagree on Pro write access. The developer docs and the Help Center do not say the same thing about which plans can use write tools. The only answer that counts is what your account does when you run Test B.
- Do not move your Codex work over blindly. Nothing here reads your Codex sessions or your global agent instructions. If you want to hand a task across, write a short handoff and pause the other editor first so two agents are not editing the same working copy.
If something breaks
Fix the layer that failed. Do not reinstall everything.
| What you see | Where to look |
|---|---|
| No 6 Pro in the picker, or no Developer mode | Your account and workspace. Nothing on the Mac fixes this. |
| Extension paired but the connection has no actions | The Core connection in ChatGPT, tunnel health, and whether you refreshed after changing permissions. |
| Tools missing after you changed a setting | Refresh the connection, start a new conversation. Reloading the extension is a separate thing. |
TOOL_DISABLED |
That capability is off in the app, or Read-only is on. |
UNIDENTIFIED_CALLER |
Use the conversation in the paired browser. It has to be that one. |
| The wrong connector answered a read | Make sure Core is the tool attached, not some other file plugin. |
| An approval you never saw | It is waiting in the original ChatGPT window. There is no auto-allow, and you do not want one. |
Undoing it
If you decide this is not for you, the way out is short.
- Switch the app to Read-only and disconnect the tunnel.
- Remove the Core connection in ChatGPT and the extension in Chrome.
- Revoke the tunnel key and delete the tunnel on the Platform page, as long as nothing else uses them.
- Delete the app and the test folder.
That is the whole thing. An afternoon of setup, a few honest tests, and a second lane for agent work on the plan you are already paying for. Keep the fence up, widen it on purpose, and let Astra get on with it.
Dispatches
A note when something ships or when there is something worth reading.